
IT 일기장
[intelliJ] GitHub에 있는 프로젝트 소스 intelliJ에 세팅하는 방법 본문
구글링 하면서 느낀 점인데 inteliJ로 웹 프로젝트를 세팅하는 방법은 사람들마다 조금씩 달랐다.
하지만 도저히 찾아봐도 최상위 폴더 내에 소스로 구성된 프로젝트를 세팅하는 방법은 정형화 돼있지않아
구글링에서 모은 자료를 토대로 나름 정형화를 시켜봤다. 최상위 폴더가 있든 없든 이 방법으로 세팅을 했을 때
십중팔구 이 방법으로 성공했었다. 그 방법을 우선 글로 정리한 결과,
방법 (글)
-. File => New => Project from Version Control 클릭
-. GitHub에서 가져올 프로젝트 선택
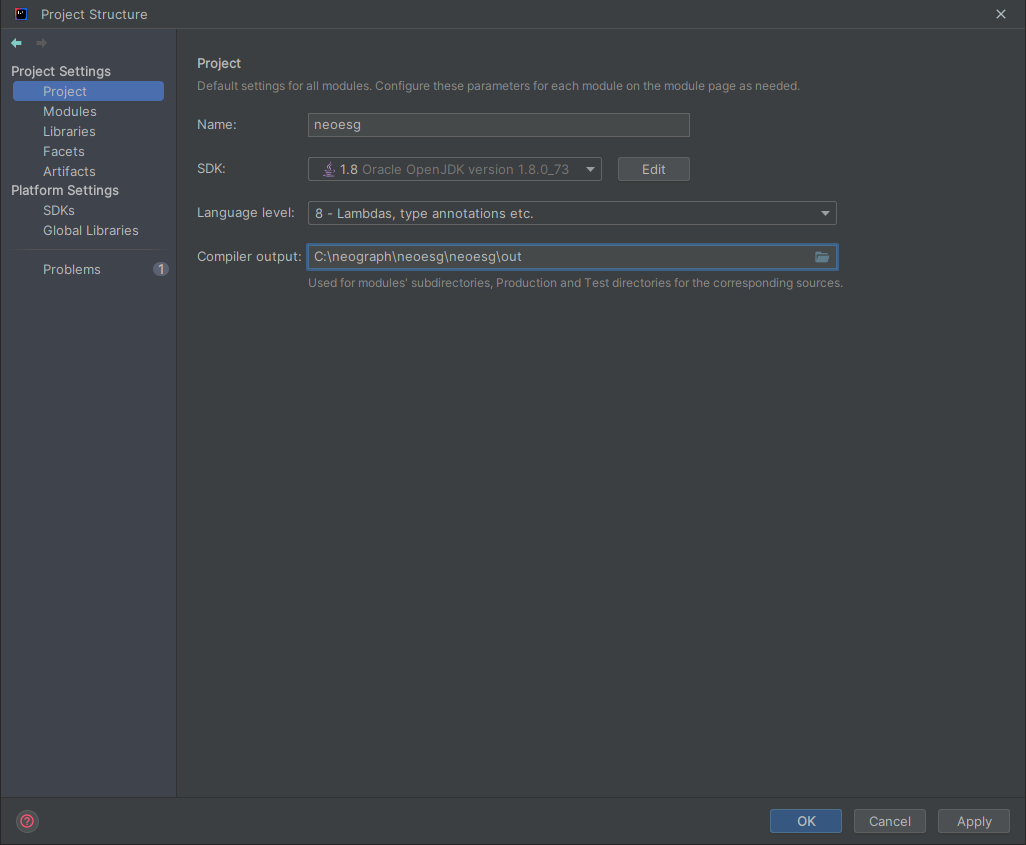
-. Project Structure (Ctrl + Alt + Shift + S) => Project => SDK 1.8 => Language level 8 => out or class 빈 폴더 만들기 (있으면 해당 경로로 지정) => Compiler output \out or \class로 지정
-. Project Structure => Modules => Sources => Language level 8
-. Project Structure => Modules => Folder 클릭 => Sources 탭 클릭 => Sources, Resource, Test Resource, Excluded Folders 설정
(Tests, Test Resource가 없는 경우 test 폴더 만들어서 지정 또는 안해도됨)
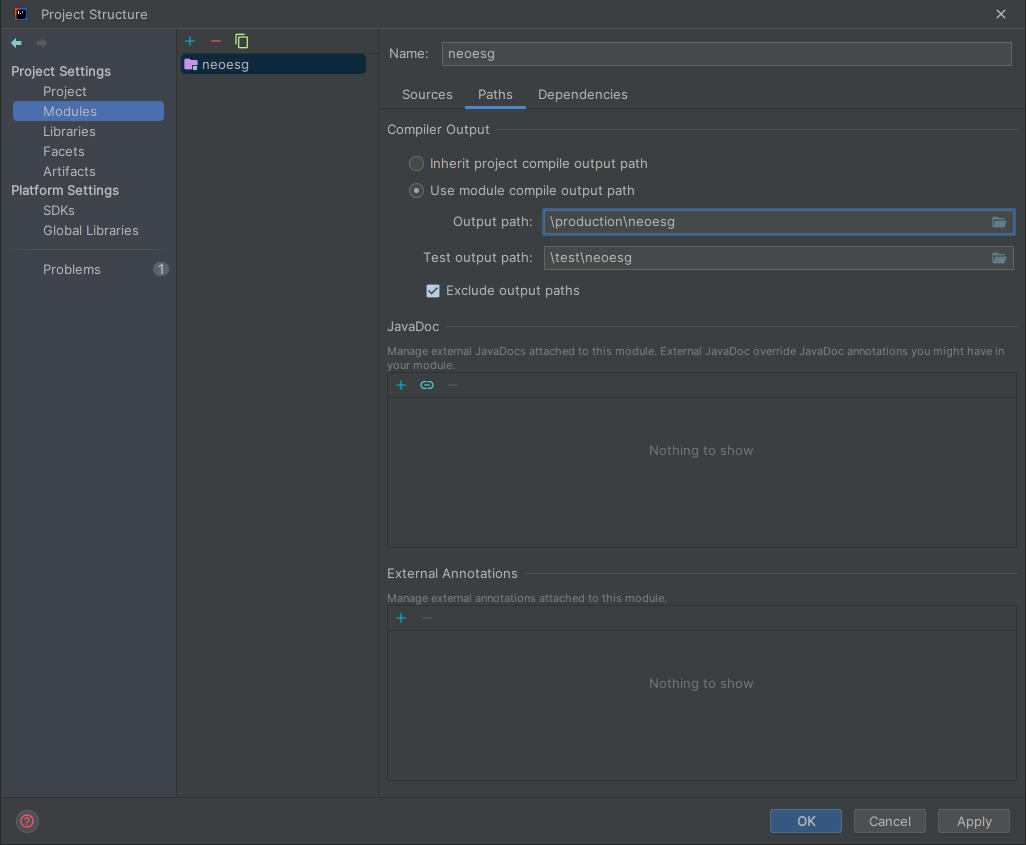
-. Project Structure => Modules => Folder 클릭 => Paths => Use module compile output path 선택
-. Project Structure => Modules => Folder 클릭 => Dependencies => Module SDK 1.8 => + 아이콘 클릭 => lib 지정 후 Provided로 지정
-. Project Structure => Facets => + 아이콘 클릭 => Web => web.xml 경로 변경 (\WEB-INF ...)
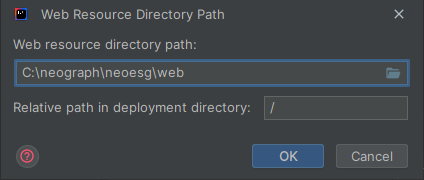
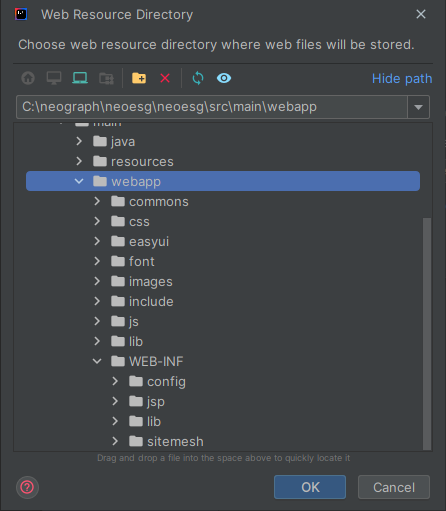
-. Web Resource Directories 경로 변경 (\src\main\webapp ...) => Create Artifact 클릭
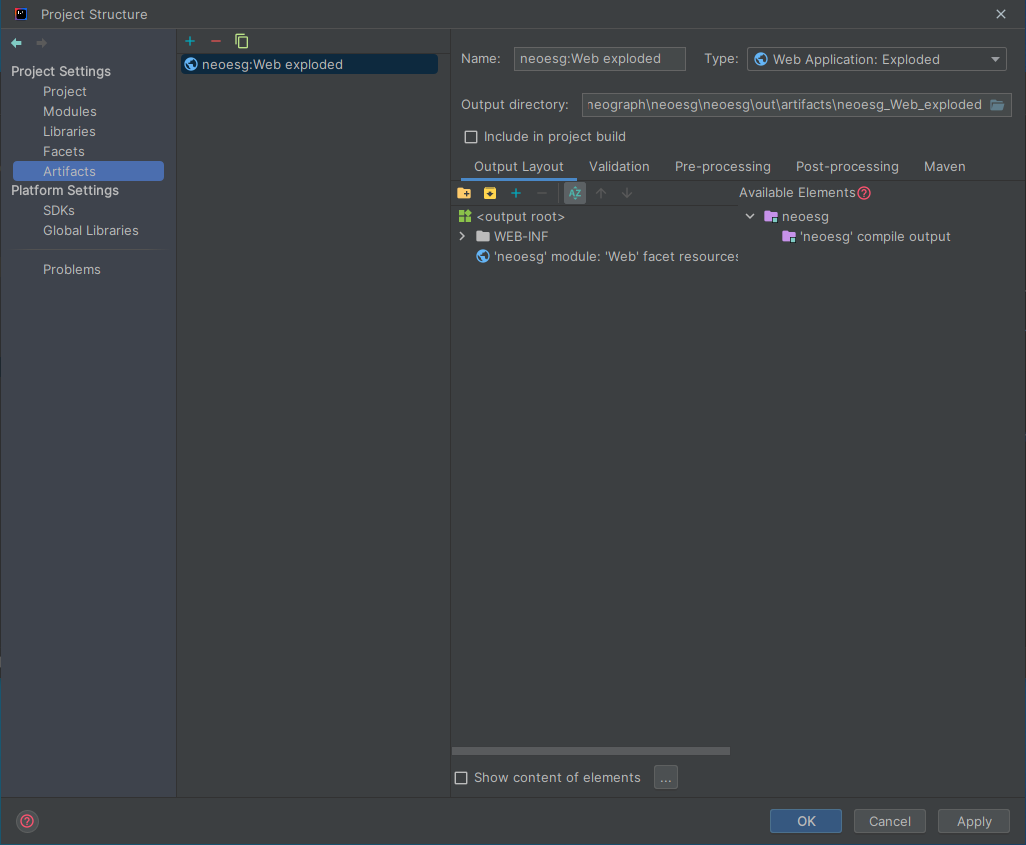
-. Project Structure => Facets => Artifacts => '프로젝트명' compile output 더블클릭 후 WEB-INF 하위로 이동했는지 확인
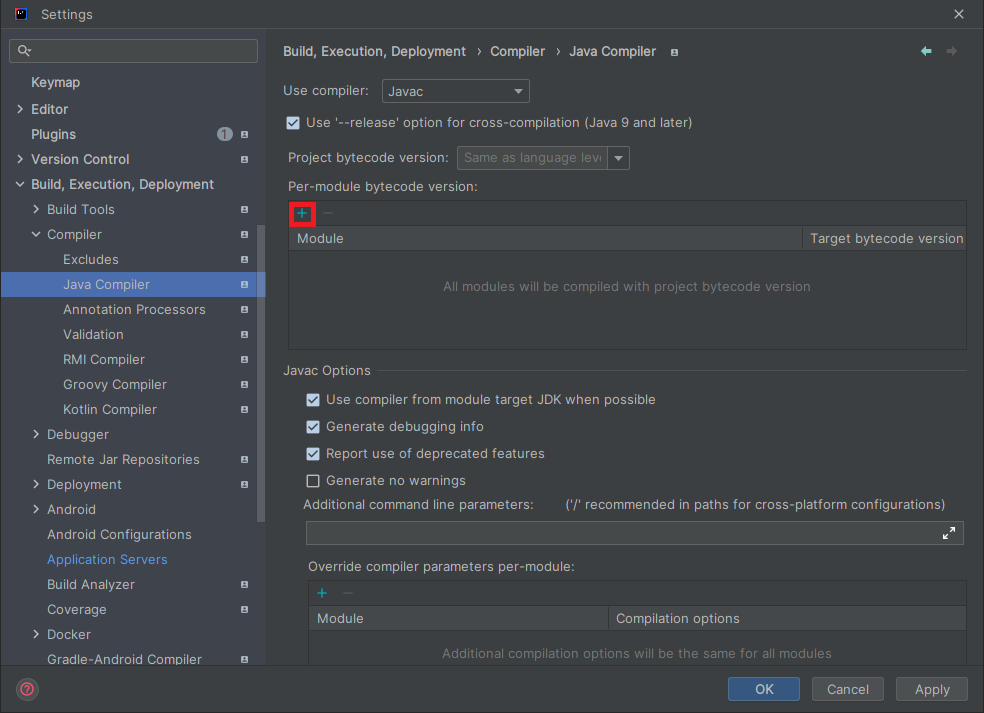
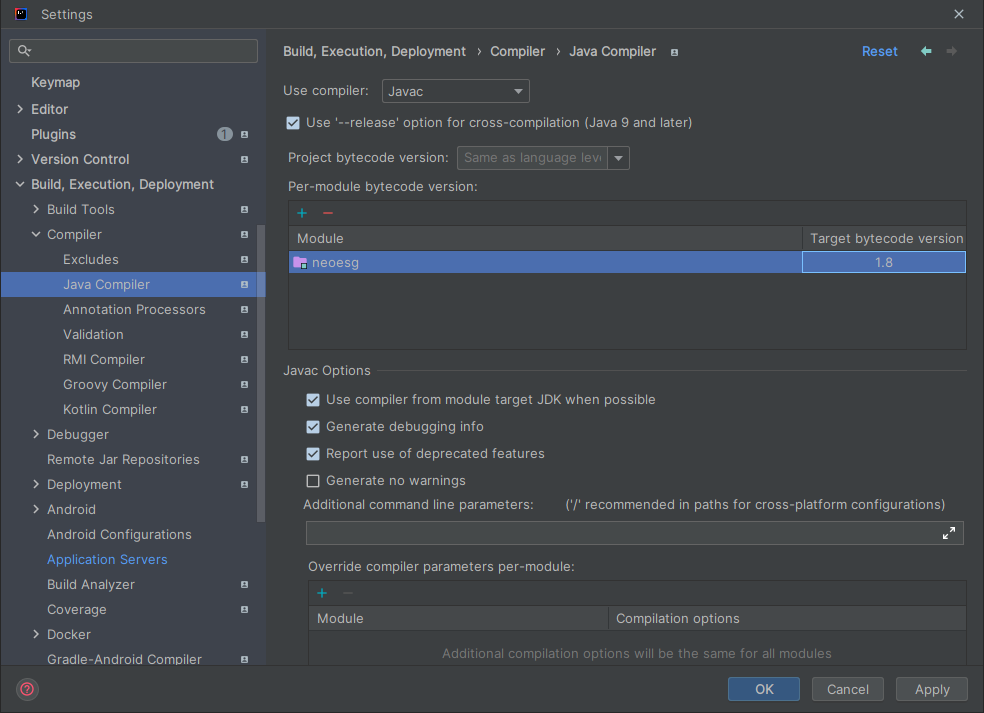
-. Settings (Ctrl + Alt + S) Build, Execution, Deployment => Compiler => Java Compiler => + 아이콘 클릭 => 프로젝트 import 후 1.8로 지정
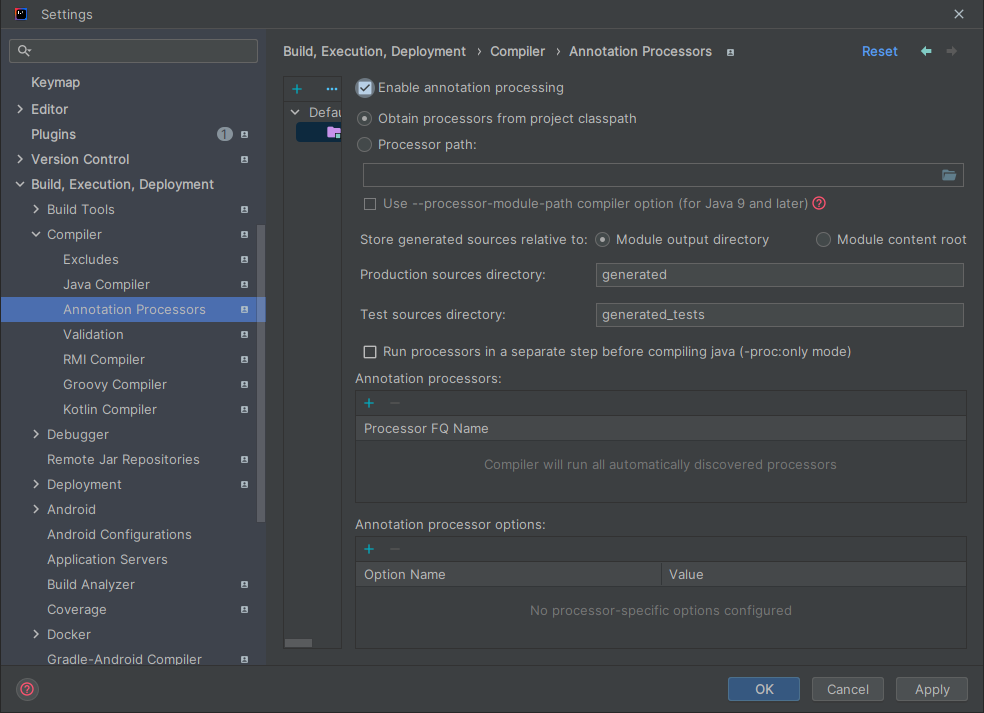
-. *lombok 그 외 annotation이 설정돼있는 경우에 세팅* Settings (Ctrl + Alt + S) Build, Execution, Deployment => Compiler => Annotation Processor => Enable annotation processing 클릭
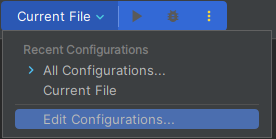
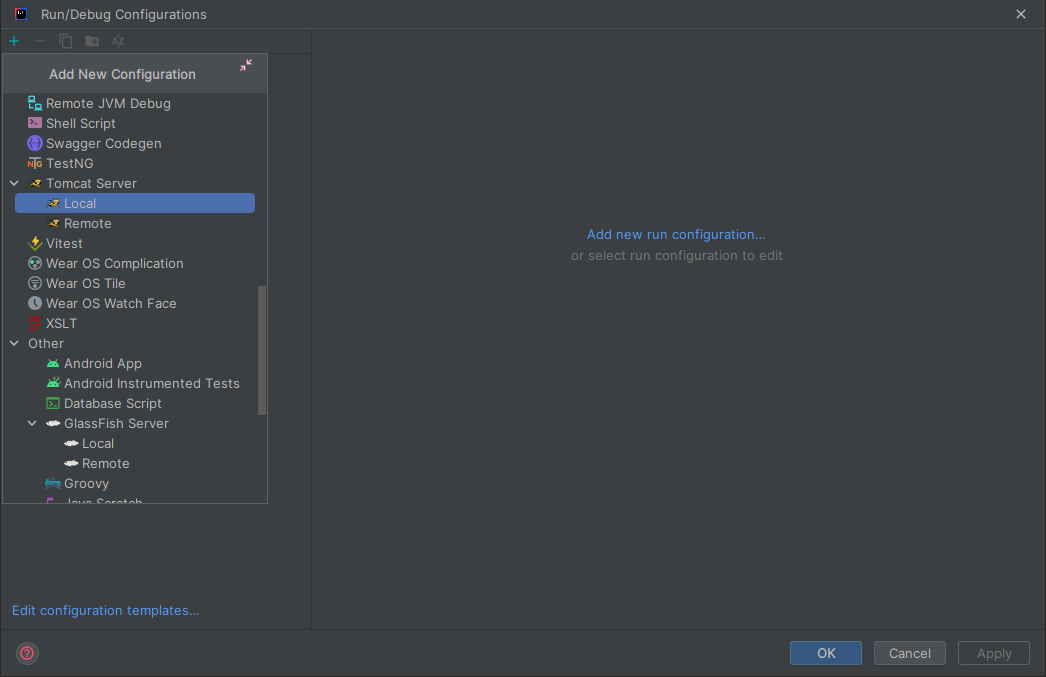
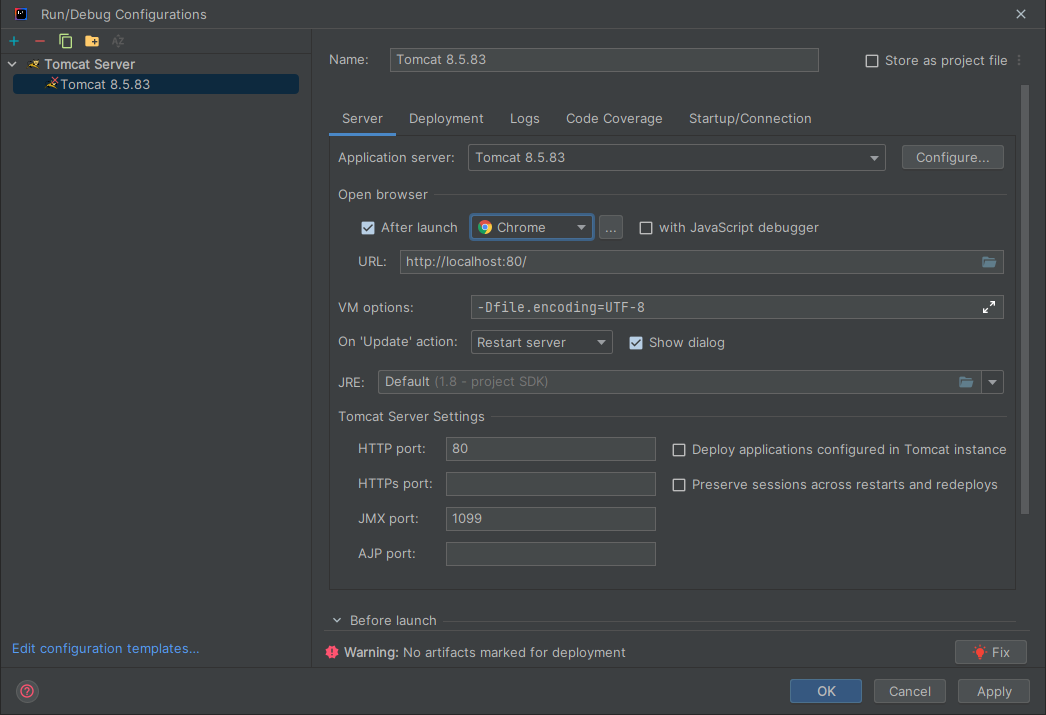
-. Current File => Edit Configurations... => Tomcat Server Local 선택 => Configure... 버튼 클릭 후 Tomcat 경로 지정 => Chrome으로 선택 => VM options -Dfile.encoding=UTF-8 => Fix 클릭
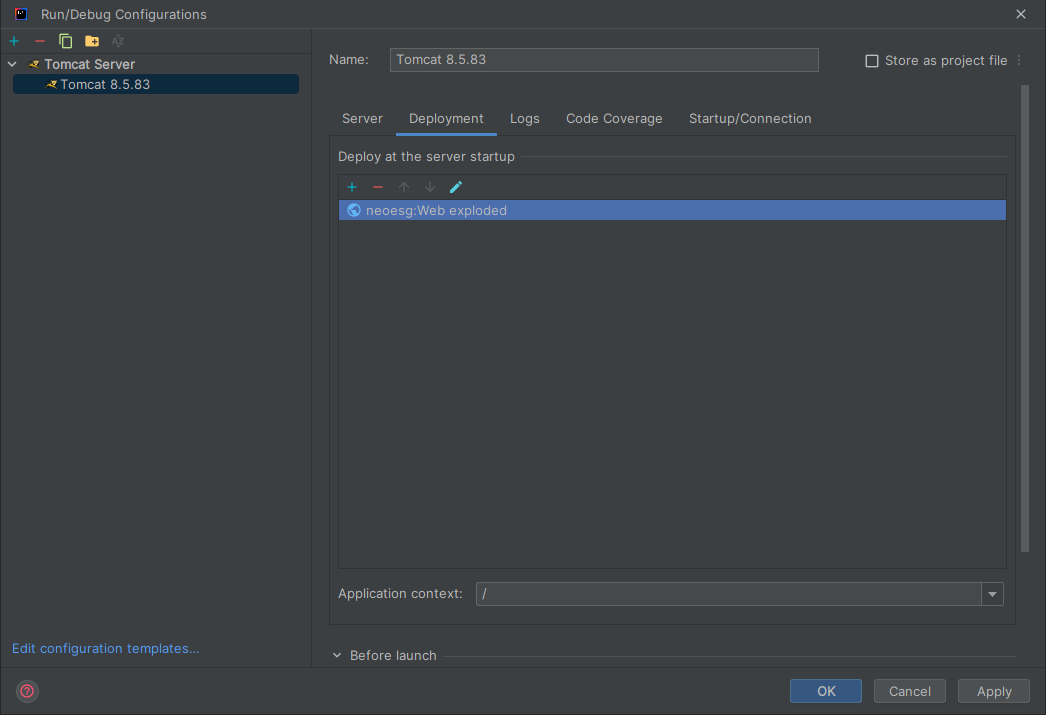
-. Application context /로 입력 후 OK
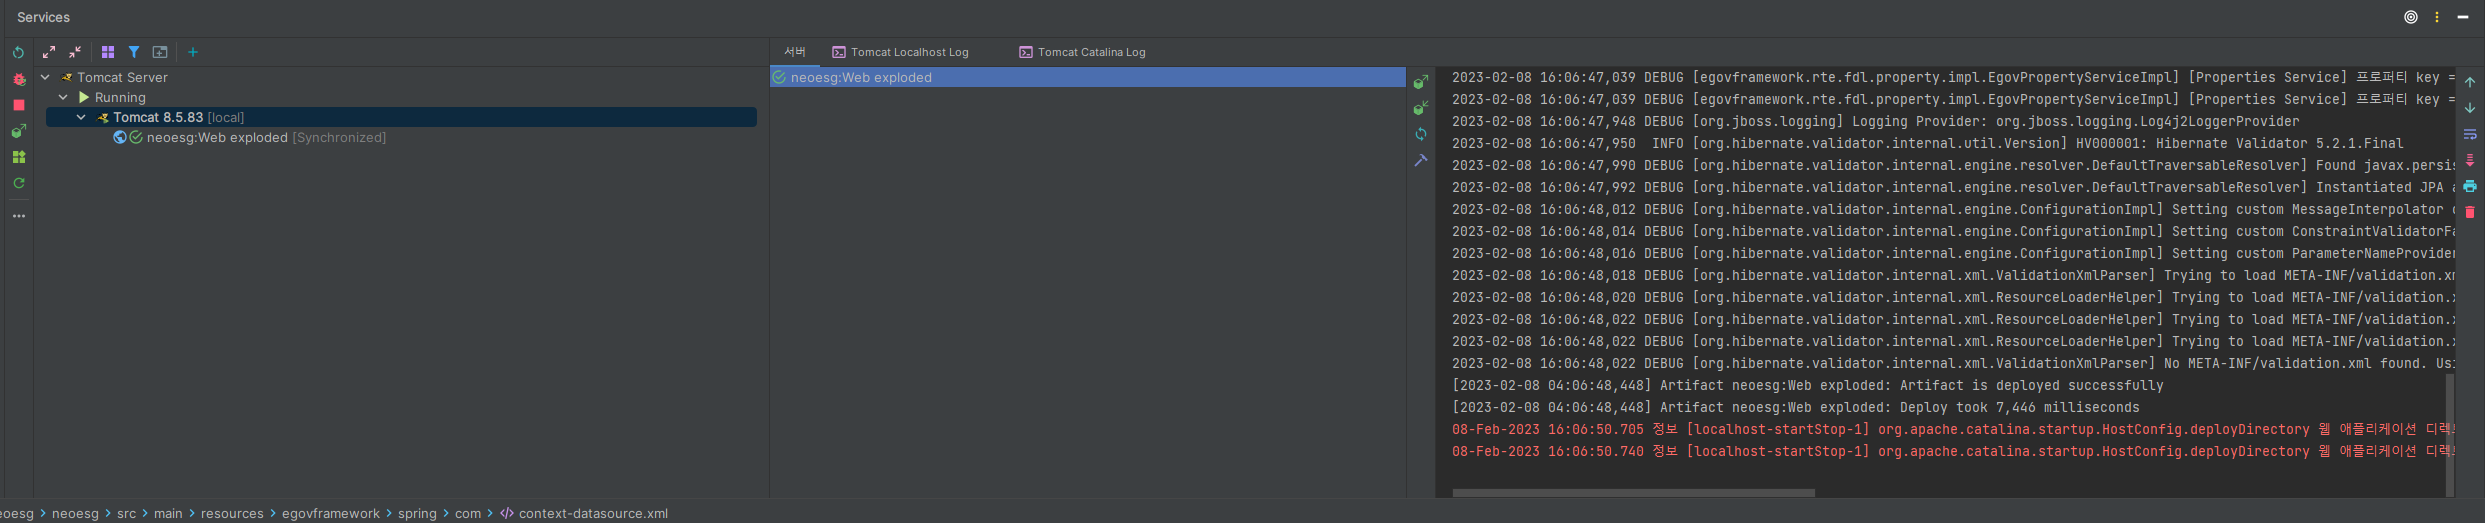
-. Tomcat 실행 후 확인
방법 (사진)
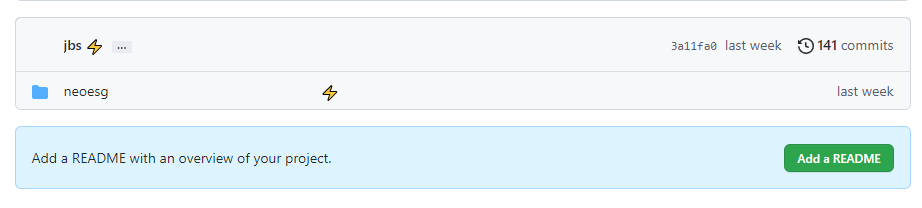
초기 GitHub 프로젝트 세팅은 다음과 같이 구성돼있다. 보통은 이렇게 폴더가 안만들어져 있고 바로 소스를 배포하지
SVN에서 폴더를 재구성하자니.. 그렇다고 폴더 하위 소스로 프로젝트를 지정해서 쓰자니 경로 지정하며 쓸데없는데 시간 뺏기기가 싫어 그대로 진행했다
File => New => Project from Version Control 클릭
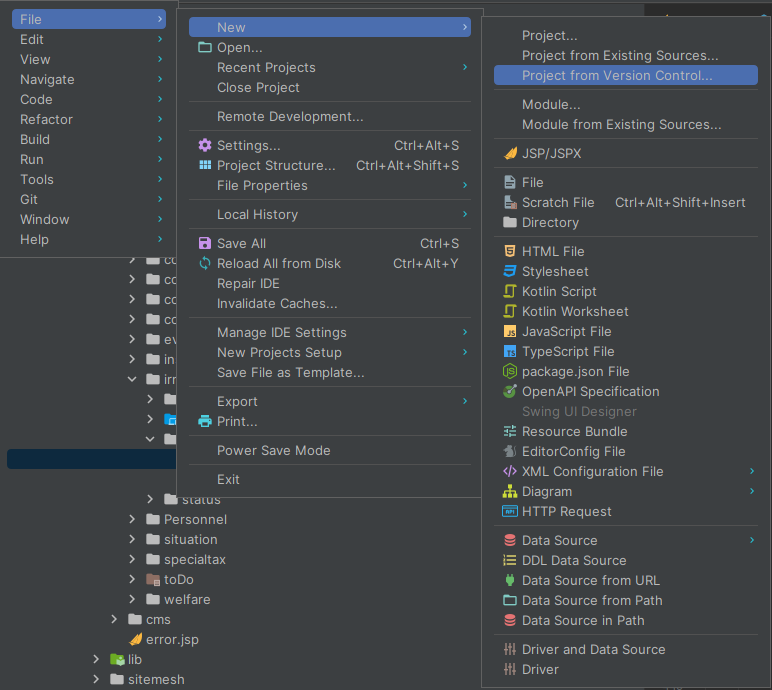
GitHub에서 가져올 프로젝트 선택

Project Structure (Ctrl + Alt + Shift + S) => Project => SDK 1.8 => Language level 8 => out or class 빈 폴더 만들기 (있으면 해당 경로로 지정) => Compiler output \out or \class로 지정
Project Structure => Modules => Sources => Language level 8

Project Structure => Modules => Folder 클릭 => Sources 탭 클릭 => Sources, Resource, Test Resource, Excluded Folders 설정 (Tests, Test Resource가 없는 경우 test 폴더 만들어서 지정 또는 안해도됨)

Project Structure => Modules => Folder 클릭 => Paths => Use module compile output path 선택
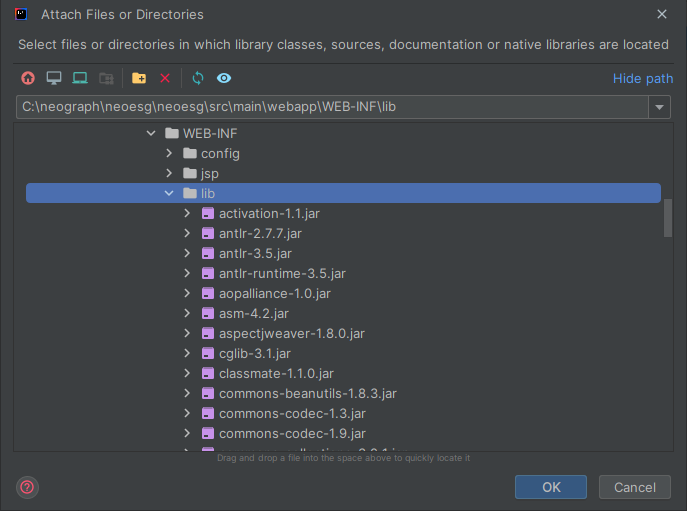
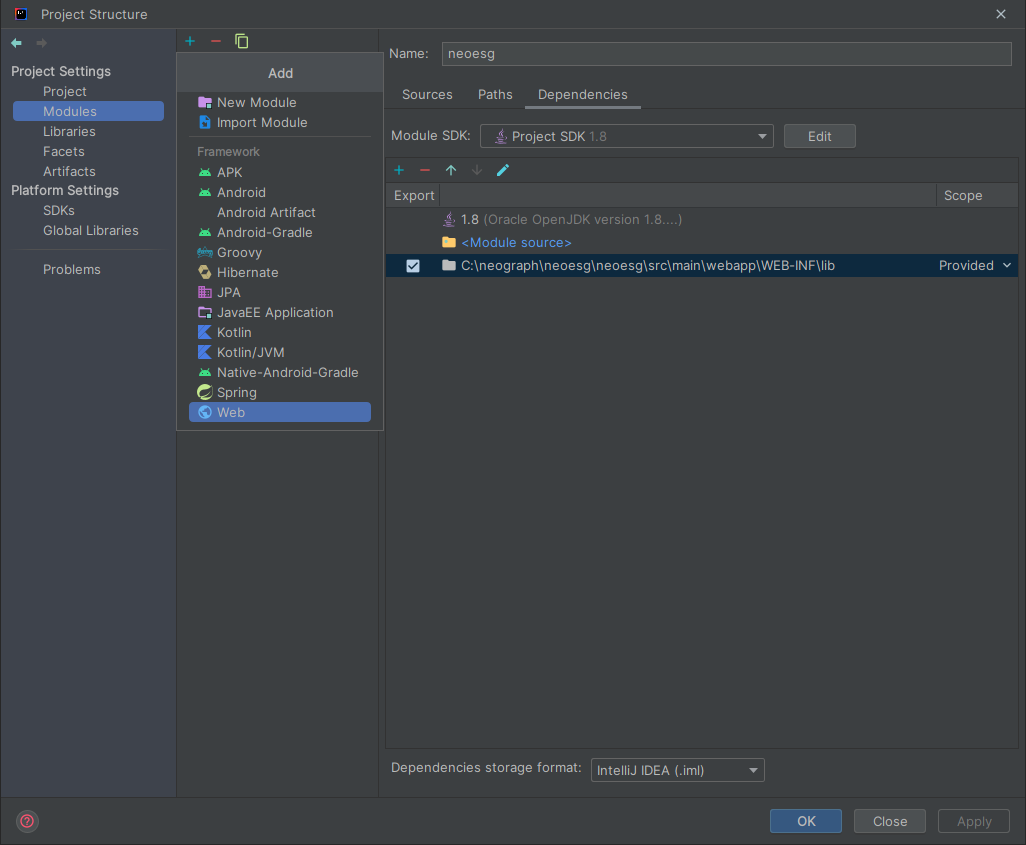
Project Structure => Modules => Folder 클릭 => Dependencies => Module SDK 1.8 => + 아이콘 클릭 => lib 지정 후 Provided로 지정
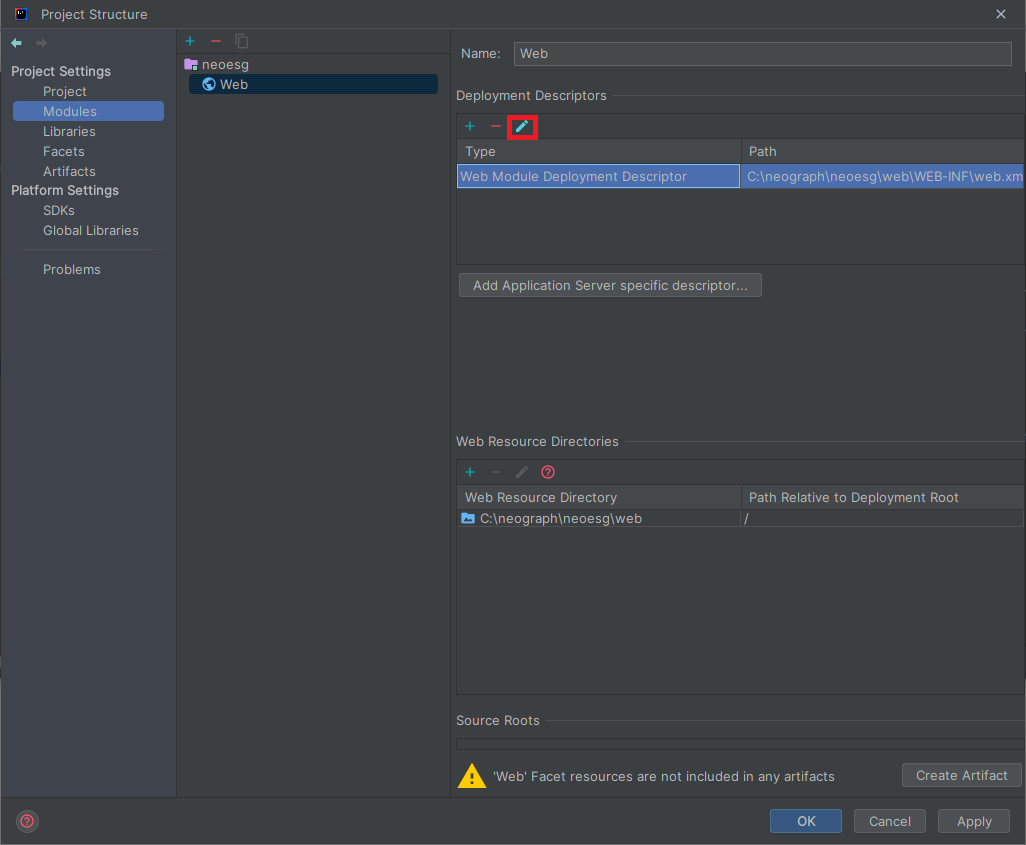
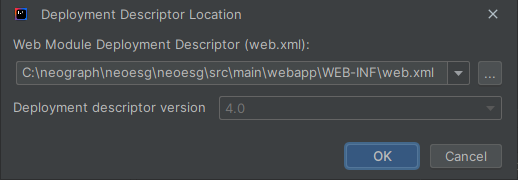
Project Structure => Facets => + 아이콘 클릭 => Web => web.xml 경로 변경 (\WEB-INF ...) => Web Resource Directories 경로 변경 (\src\main\webapp ...) => Create Artifact 클릭
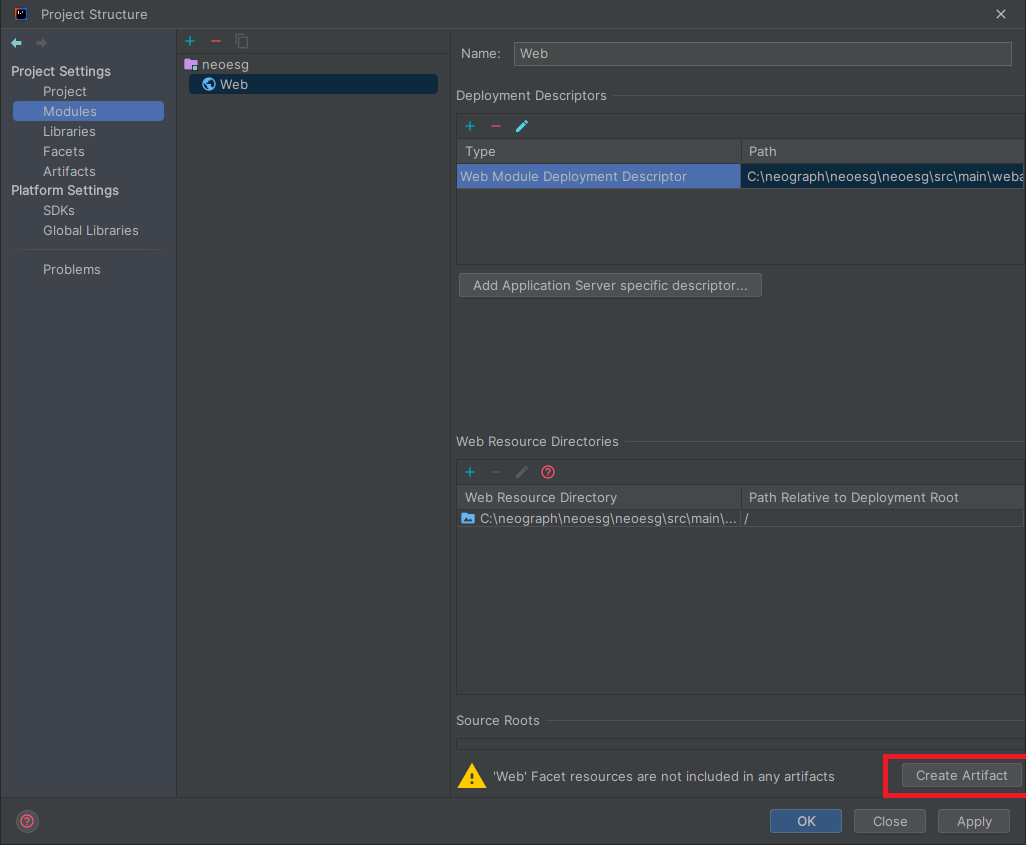
Project Structure => Facets => Artifacts => '프로젝트명' compile output 더블클릭 후 WEB-INF 하위로 이동했는지 확인
Settings (Ctrl + Alt + S) Build, Execution, Deployment => Compiler => Java Compiler => + 아이콘 클릭 => 프로젝트 import 후 1.8로 지정
*lombok 그 외 annotation이 설정돼있는 경우에 세팅* Settings (Ctrl + Alt + S) Build, Execution, Deployment => Compiler => Annotation Processor => Enable annotation processing 클릭
Current File => Edit Configurations... => Tomcat Server Local 선택 => Configure... 버튼 클릭 후 Tomcat 경로 지정 => Chrome으로 선택 => VM options -Dfile.encoding=UTF-8 => Fix 클릭
Application context /로 입력 후 OK
Tomcat 실행 후 확인
'개발환경 > IntelliJ' 카테고리의 다른 글
| [intelliJ] Spring Boot 정적 파일 서버 재시작 없이 새로고침으로 바로 반영 (0) | 2023.02.14 |
|---|---|
| [IntelliJ] intelliJ 단축키 모음 (0) | 2023.02.13 |
| [intelliJ] camel case로 변환하는 방법 (0) | 2023.01.31 |

